The History Window works like a multiple undo/redo by displaying every step in the creation and manipulation of a design and letting you jump between any of these steps (during the current working session).

You can set a maximum of 100 steps in the History Window, allowing you to return to earlier stages of the design, as well as various ways to navigate through them. Setting a high number of histories uses more system resources (memory and disk) and will slow down the performance of the software, so we would recommend starting with around 30 steps and then increasing this if more are needed.
Anything that changes the design content will be shown in the History Window. For example the use of tools, filters, separations, adding and removing layers, changing layer colours, change the document size, editing grids in a Texture Mapping Scene or editing weaving plans and vectors will all be recorded in this window.
Every manipulation of a design is recorded in its history, even if the History Window is not open. To revert to an earlier stage of a design, simply open the History Window and click on the appropriate step.
The History Window will update to show the history steps for the active design, so you can effectively work backwards and forwards between multiple designs at once.
The movie
Number of histories
Setting the number of histories recored for each design
- Open a design and navigate to the Window Menu > History > Set Maximum.
- Enter the number of history steps you would like to record for your designs and click OK.
 Remember that the higher this is, the more memory you will use as AVA will remember this number of steps per open design. If you notice your system performance degrading, you should consider reducing this number.
A basic guide
- Open a design and make some changes.
- Go to Window Menu > History > Show, or use the shortcut command shift H. The History Window will open showing the steps you have performed so far.
- Now do one of the following:
- Click through the steps in the history to view the stages of design development. The current step will be displayed in bold type.
- Clicking and dragging through the list of history items shows the active item in real time making it easier to locate the particular history you require.
- Go to Window Menu > History > Next or Last to move backwards or forwards through the steps.
- Use the shortcut keys ⌘[ or ⌘] to move backwards or forwards through the steps.
Lock and rename
You can lock your history items so that you can go back to a specific stage of your design at any time. It will simply lock the history level and make it permanently available within the History window whilst the design is open. Another advantage of locking your history is that you can reduce the amount of history steps stored. Therefore, you can set less history steps which in turn improves the overall speed of the software. You can to go back, at any moment, to the locked history item and ignore the changes made in between.
When a file is open, locked history items will not be deleted even if the number of histories exceeds that set in the maximum History preference.
- Open the History Window from the Window Menu.
- Click on the icon which looks like an outline of a padlock. The icon will changes once it is clicked on:
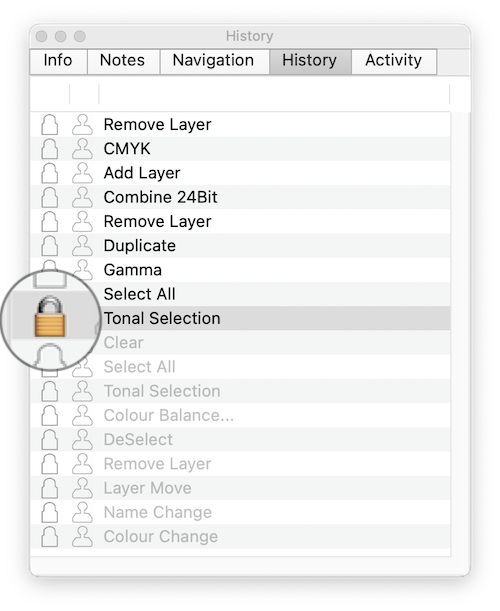
To unlock a history item, simply click on the padlock icon again. The lock will disappear.
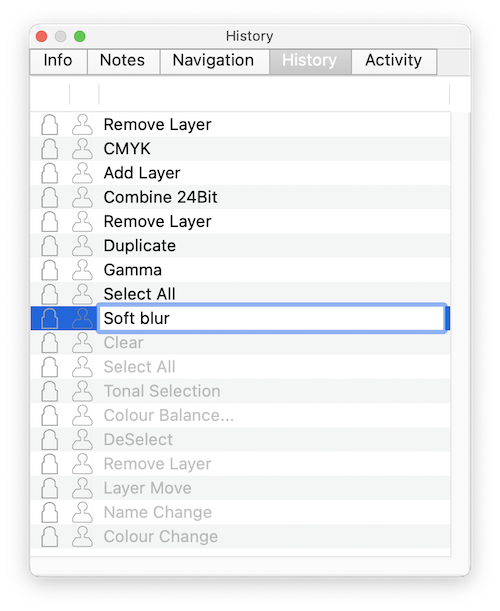
You can rename history items, making it easier to recognise them, which is particularly useful with locked history steps. To rename a step, simply double click on its description and type a new name.
Deleting history items
To undo a step, do one of the following:
- go to Window Menu > History > Clear to delete all the histories for a particular design.
- move back through the history and then start editing the design. All subsequent histories will be deleted.
After just one new action, Undo can be used to bring back the original histories. However after two or more new actions are made in the design, the original histories are permanently deleted.
Carbon copying from history
You can use the Carbon Copy Tool to restore part of a design from a particular stage in history. The benefit of this is that you can selectively paint effects from an earlier version of the design to the latest version. This can be ideal for retouching or restoring images after applying filter effects for example, thus blending the old with the new.
To carbon copy from a step in history, follow the steps below;
- Open the History Window from the Window Menu.
- Identify the step you wish to copy back to, and click on the Carbon Copy icon to the left of the history step. The lock will be turned on automatically.

- Select the Carbon Copy Tool and set the mode accordingly.

- Define the starting point for the Carbon Copy by holding down the ⌥ (option key) and clicking on that point. In the Carbon Copy settings, the name of the history item will appear to highlight that you are painting from the history.
- Start painting on your design and the information from the selected history step will replace the latest information in the areas you paint. In the example below, the image has been desaturated, and the carbon copy tool is being used to paint back some colour into specific areas.

To remove the carbon copy function from the history item, simply place your cursor over the carbon copy icon and click on it. The icon will disappear.
Automation
Palettes are a fantastic way of speeding up your workflow. They reduce lengthy processes to one click of a button, and some require you to go back in history.
Our Production Print Palette button applies a filter designed to simulate a blurred effect which is naturally applied in some production processes, prints the file to your CAD proofer, then undoes the filter. Undoing the filter is an important step because you do not want this effect to be physically applied to the design, otherwise you will double the effect in production.
Palettes are used to automate tasks. To add a history item to a palette, simply drag one from the History Window to your palette:
It is important to note that after downloading this Palette, it is completely customisable to your needs. If you require help doing this, then please contact AVA Technical Support.